BC-337 User Manual
version 1.2
BC-337
GPS Receiver with Compact Flash Interface
User Manual
page 1 of 15
BC-337 User Manual
version 1.2
1.
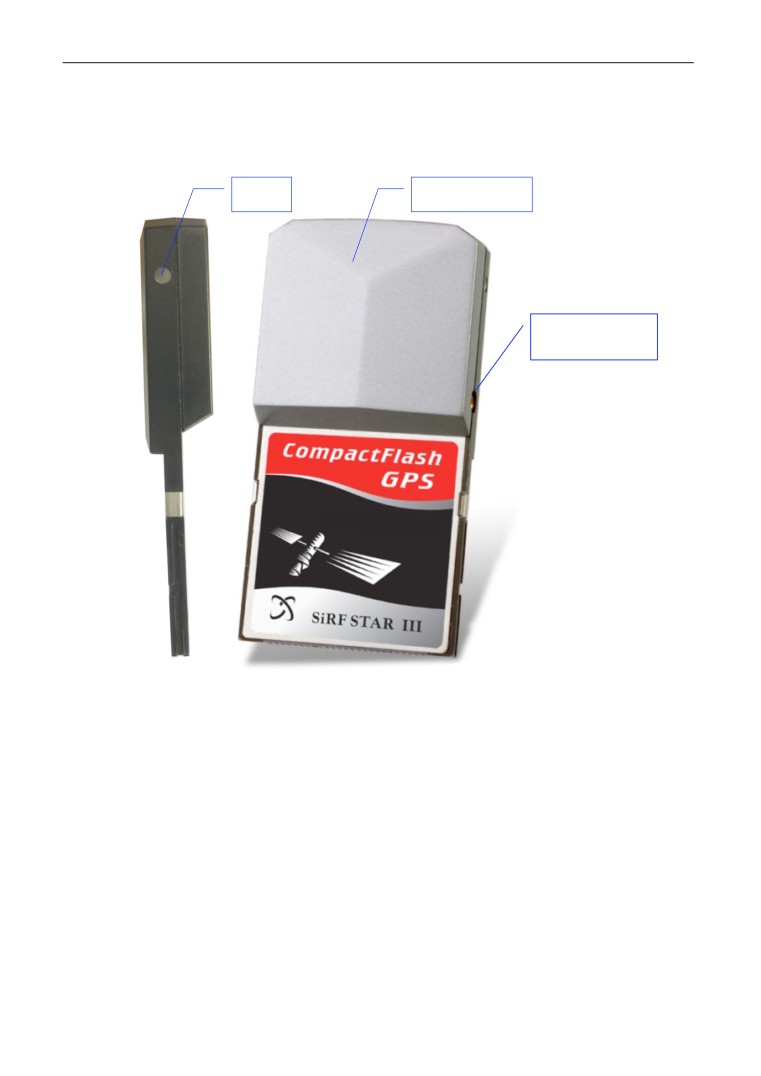
BC-337 at a glance
LED
Internal Antenna
External Antenna
Connector
page 2 of 15
BC-337 User Manual
version 1.2
2.
Introduction
The BC-337 is a GPS receiver with Compact Flash type I interface and it has a built-in high sensitivity
antenna for tracking signal. Based on the SiRF star III high performance GPS Chip Set with very high
sensitivity (Tracking Sensitivity: -159 dBm), it has an extremely fast TTFF (Time To First Fix) capability
at the low signal level. The BC-337 is well suited to system integration and users who use PDA or
notebook PC. It satisfies a wide variety of applications, including car navigation, personal navigation of
touring devices, tracking and marine navigation purpose. Users can simply plug it into a PDA or other
type of handheld PC running with suitable mapping and routing software for navigation.
2.1. Package
Before you start up, make sure that your package includes the following items. If any items are missing
or damaged, contact your dealer immediately.
• GPS Receiver (BC-337)
• CD (including User Manual, Testing Program, Driver for PCMCIA card slot of Notebook PC)
* Optional Accessory: CF-to-PCMCIA adapter
* Optional Accessory: External Antenna
2.2. LED Function
LED off
Receiver power off
LED on
Searching the signal
LED flashing
Position is fixed
2.3. External Antenna
Basically, you don’t need external antenna to perform GPS positioning with BC-337; it already has a
built-in antenna. The only condition that you need external antenna is when BC-337 unit can not “see”
the sky, For instance, when you are in a car, or any environment that GPS signal is blocked, the
external GPS antenna will help to receive better GPS signal.
Plug the external antenna with MMCX connector to the plug on BC-337. Place the magnetic external
antenna on the roof of the car or the outdoor open-space, and make sure not to put it upside down.
That is, the magnetic side is the bottom side, and the upper side must face to the sky in order to
receive better signal.
Note: Hold the antenna connector while you plug the external antenna into the BC-337 or unplug
the external antenna from the BC-337. Do not pull it by the cable line.
page 3 of 15
BC-337 User Manual
version 1.2
3.
Specification
Electrical Characteristics (Receiver)
Frequency:
L1, 1575.42MHz
Channel:
20 channels all-in-view tracking
Chipset:
SiRF Star III/LP Single
Interface
Interface:
Compact Flash Type I
Accuracy
Position Accuracy:
10 meters, 2D RMS, (No SA).
5 meters, 2D RMS, (WAAS enabled).
Datum
Datum:
WGS-84
Acquisition Rate
Hot Start:
1 sec. average
Warm Start:
38 sec. average
Cold Start:
42 sec. average
Reacquisition Time:
0.1 sec. average
Protocol
GPS output data: NMEA 0183 protocol, supports command GGA (1 sec), GSA (1 sec),
GSV (5 sec), RMC (1 sec), (VTG and GLL are optional).
Baud Rate: 4800 bps,N,8,1
Dynamic Condition
Maximum Altitude: 18,000 meters (60,000 feet) max.
Maximum Velocity: 515 meter/sec. (1,000 knots) max.
Power
Voltage: DC 3.3 V ± 5%
Power consumption: 90 mA
Physical characteristics
Antenna Type: Built in antenna
External Antenna Interface: MMCX (Optional)
Dimension: 3.26” x 1.68” x 0.52” (83 mm x 42.8 mm x 13.3 mm)
LED Indicator: GPS fix status.
(blinking light: GPS is fixed, solid light: GPS is not fixed.)
Temperature
Operating Temperature: -10°C to +70°C
Storage Temperature: -40°C to +85°C
Operation Humidity: 95%, Non- Condensing
page 4 of 15
BC-337 User Manual
version 1.2
4.
Installation
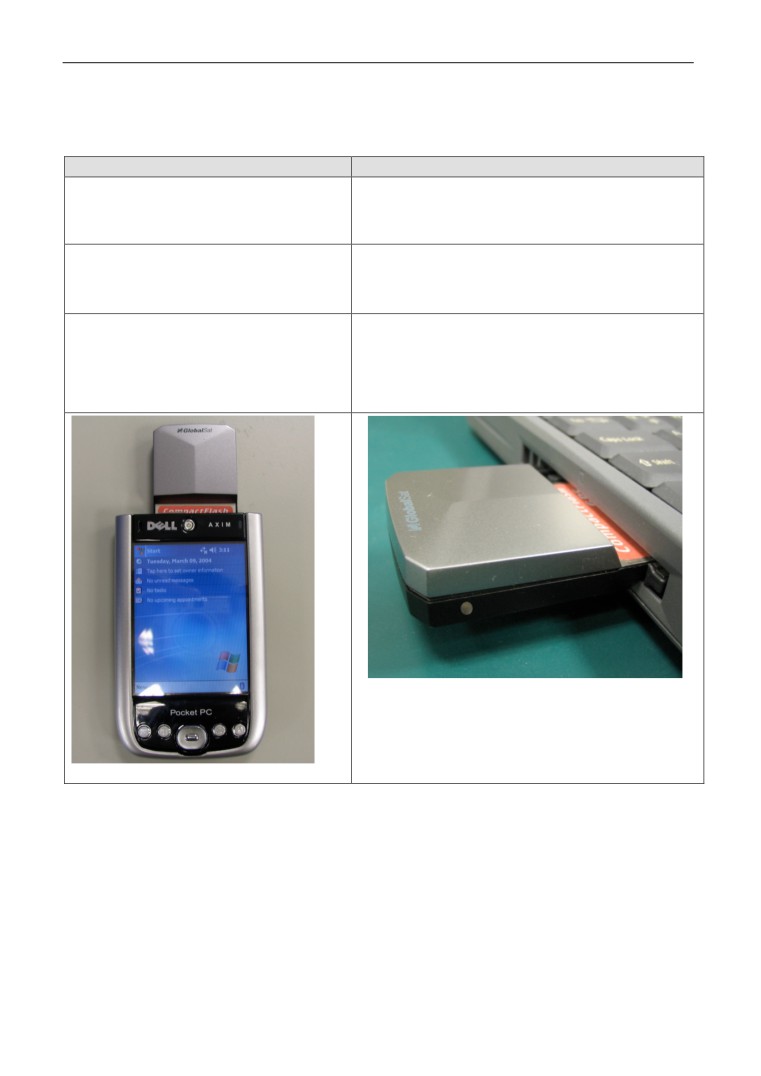
The BC-337 GPS receiver supports plug and play.
For PDA
For Notebook PC
1. Plug BC-337 GPS receiver into the
1. Plug BC-337 GPS receiver into PCMCIA card slot on
Compact Flash slot of your PDA.
notebook PC through a general “Compact Flash to
PCMCIA adapter”.
2. Run the suitable mapping/navigation
2. Install the “Compact Flash to PCMCIA” driver for
software, select the correct COM port and
Windows 98, ME, 2000 or XP. (Please see section 3.2
set the baud rate to 4800,N,8,1.
for details.)
Usually the default COM port is COM2, but it
3. Run the suitable mapping/navigation software, select
depends on your PDA type. You can use the
the correct COM port and set baud rate to 4800,N,8,1.
testing program (can be found within the CD)
to detect the COM port that the BC-337 is
currently using.
page 5 of 15
BC-337 User Manual
version 1.2
4.1. Test the BC-337 GPS receiver for PDA
Note: Before you do the following test, please refer to GPS Information User Manual for installing
the “GPSinfo” testing program. You can find the program and Manual in CD. ( “GPSInfo.exe“
and “gpsinfo_menu_Eng_rev Ver 1.02.pdf”)
The testing program only supports the Microsoft Windows CE & Pocket PC based PDA platform.
1. Plug BC-337 into your PDA.
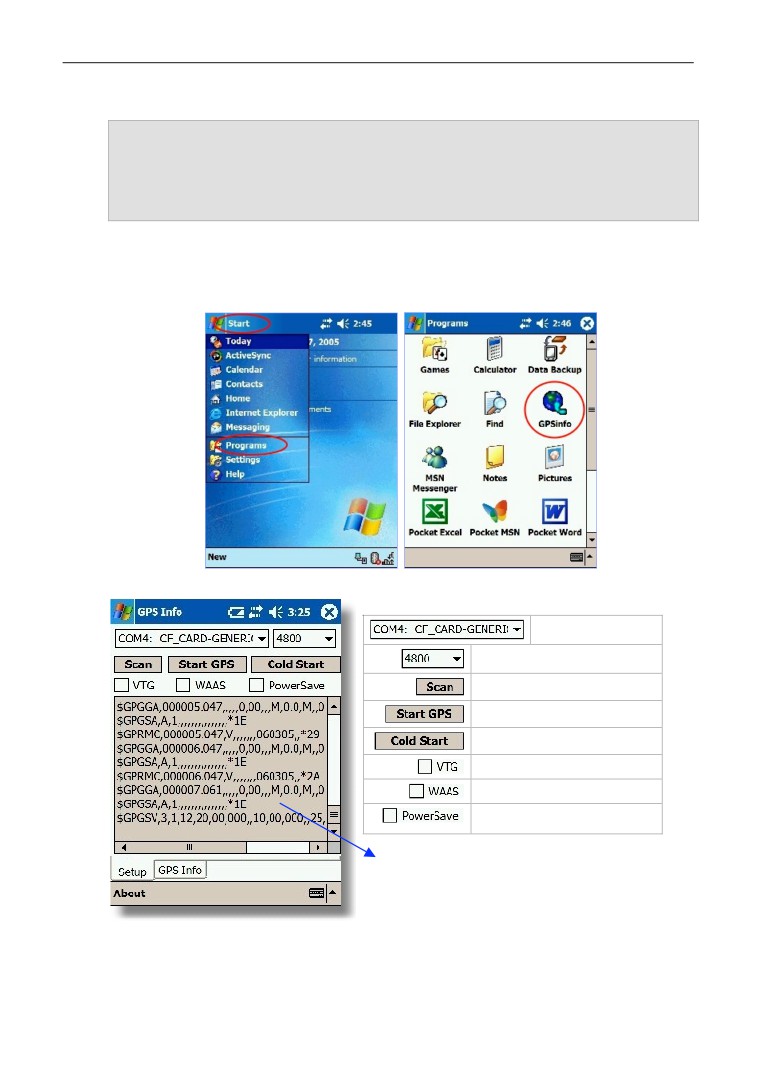
2. In your PDA, tap “Start”, “Programs” and tap “GPSinfo” icon.
3. You must select COM port (CF-CARD-GENERIC), Baud Rate (4800) and tap the [Start GPS]
button to start receiving GPS data. You can use this testing program to check the GPS data
received by BC-337.
Here is the description of “GPSinfo” testing program as follows:
COM Port Select
Baud Rate Select
Scan COM Port
Start/Close receiving GPS data
Cold Start to GPS
Enable/Disable VTG output
Enable/Disable WAAS/EGNOS
Enable/Disable Trickle power mode
GPS data from satellites
page 6 of 15
BC-337 User Manual
version 1.2
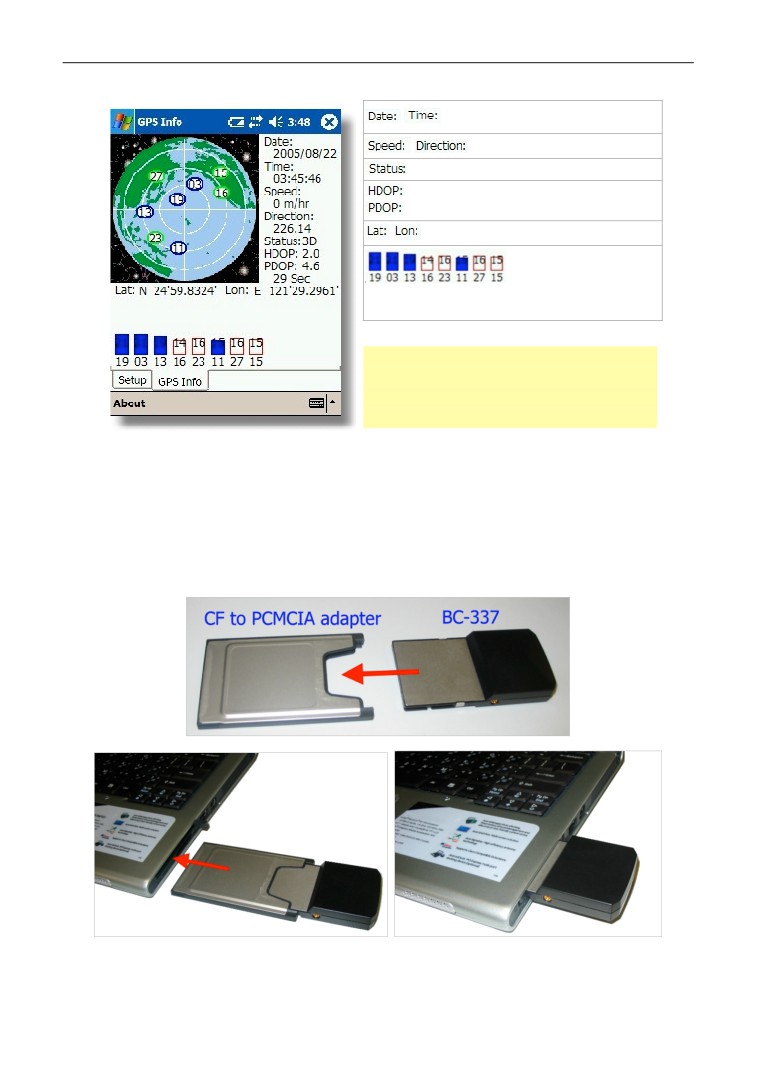
Date and Time information
Speed and Direction
2D or 3D
Horizontal Dilution of Precision
Positional Dilution of Precision
Latitude and Longitude
The number in above is the signal intensity.
The number in below is the satellite number.
For more detail about this GPS Info testing program,
please refer to the GPS Information User Manual,
you can find it in the CD.
(“gpsinfo_menu_Eng_rev Ver 1.02.pdf”)
4.2. Install the “Compact Flash to PCMCIA” driver
Insert the BC-337 into the “CF to PCMCIA adapter” and insert the adapter into your notebook PC. The
BC-337 GPS receiver supports the plug and play feature, so your notebook PC will detect it
automatically.
page 7 of 15
BC-337 User Manual
version 1.2
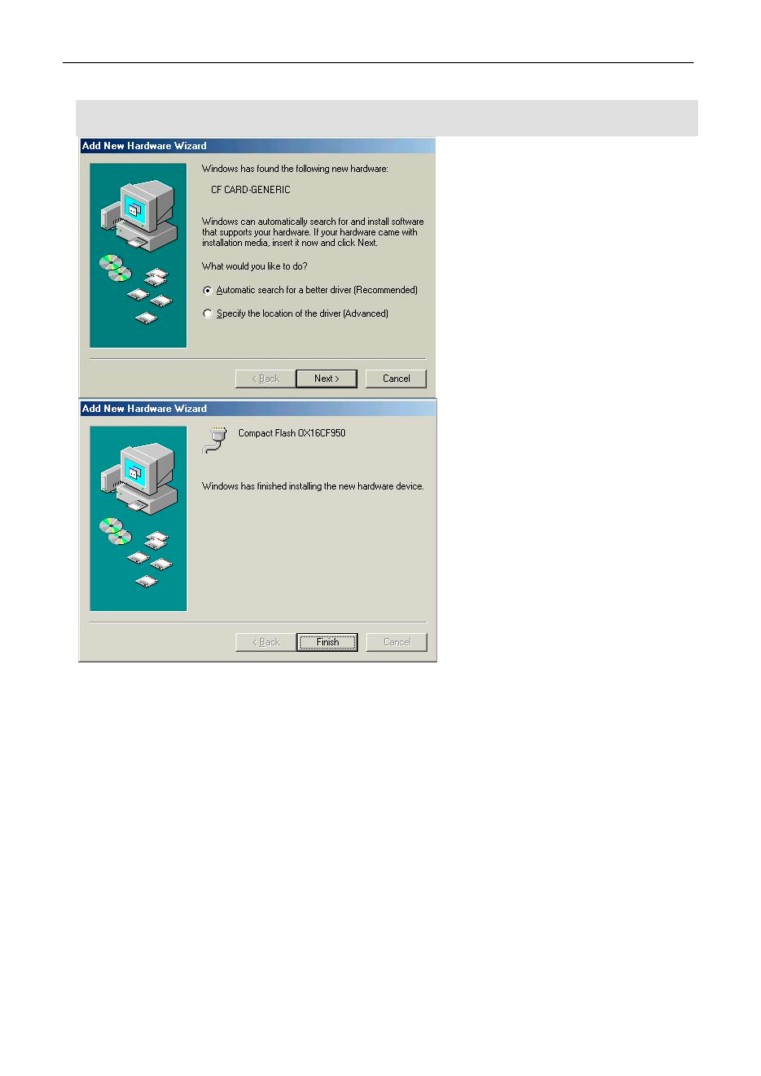
Setup for Windows 98, ME
1. The system will recognize the device.
It will show the “Add New Hardware
Wizard” dialog box. Select
“Automatic search for a better
driver”, insert the driver CD into the
CD-ROM drive and click “Next” button.
2. The system will search the driver of
this device and automatically copy the
necessary files into the system.
3. Click “Finish” button to complete the
installation.
page 8 of 15
BC-337 User Manual
version 1.2
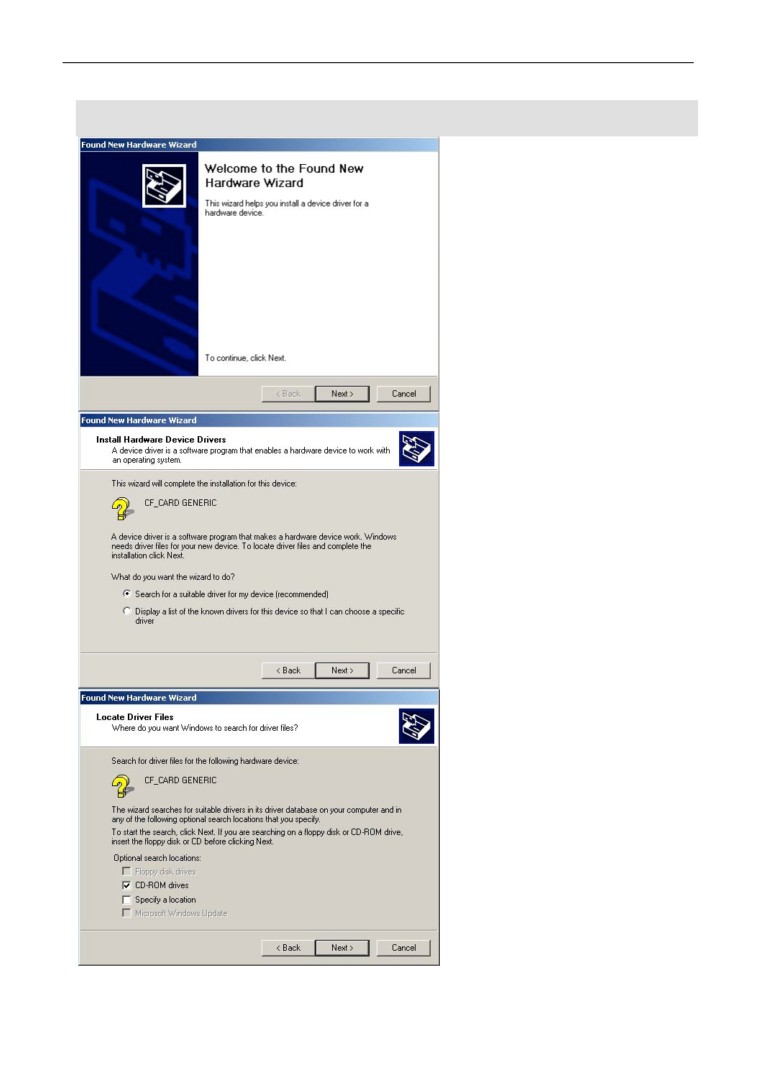
Setup for Windows 2000
1. The system will recognize the device.
It will show the “Found New
Hardware Wizard” dialog box. Please
insert the driver CD into the CD-ROM
drive and click “Next” button.
2. Select “Search for a suitable driver
for my device” and click “Next”
button.
3. Select “CD-ROM drives” and click
“Next” button.
page 9 of 15
BC-337 User Manual
version 1.2
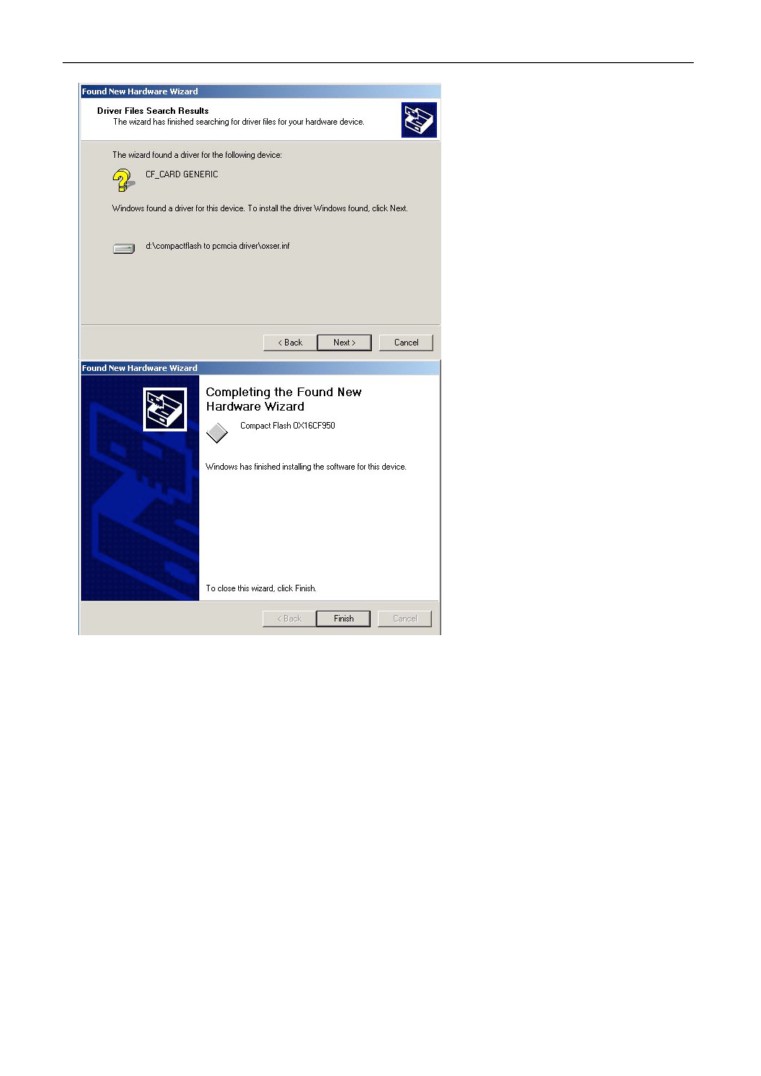
4. Click “Next” button. The driver will
copy the necessary files into system.
5. Click “Finish” button to complete the
installation.
page 10 of 15
BC-337 User Manual
version 1.2
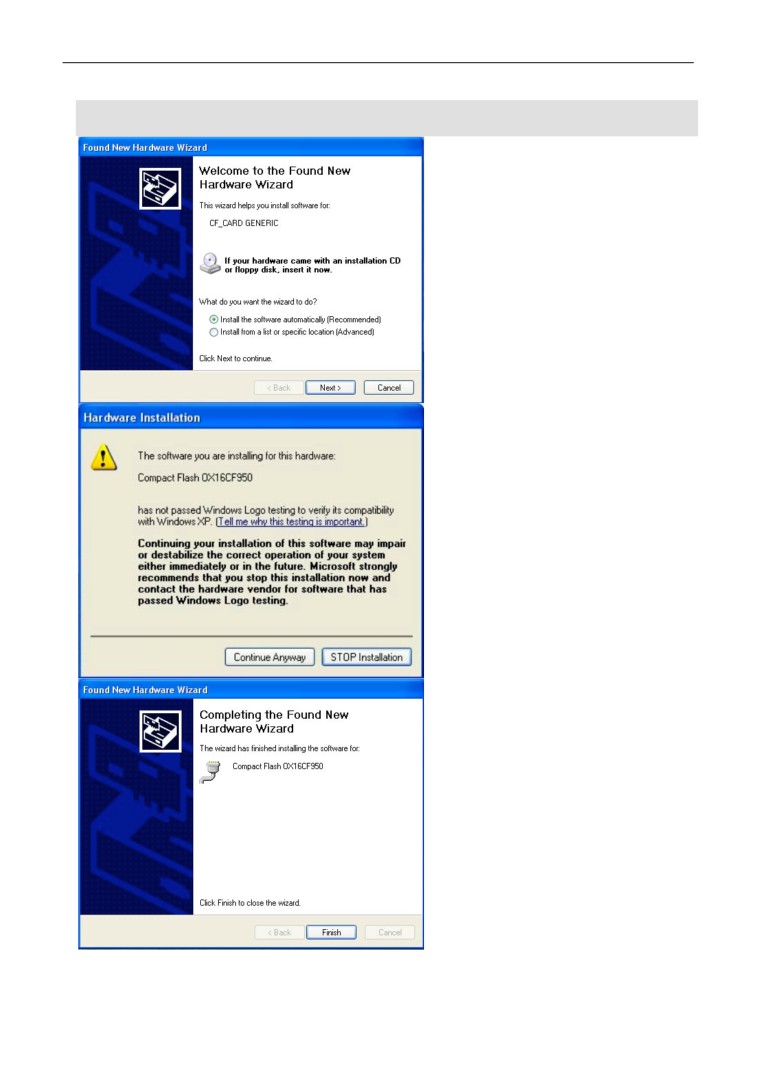
Setup for Windows XP
1. The system will recognize the device. It
will show the “Found New Hardware
Wizard” dialog box. Please select
“Install the software automatically”,
insert the driver CD into the CD-ROM
drive and click “Next” button.
2. Please click “Continue Anyway” button.
The system will search the driver of this
device and automatically copy the
necessary files into the system.
3. Click “Finish” button to complete the
installation.
page 11 of 15
BC-337 User Manual
version 1.2
4.3. Test the BC-337 GPS receiver for Notebook PC
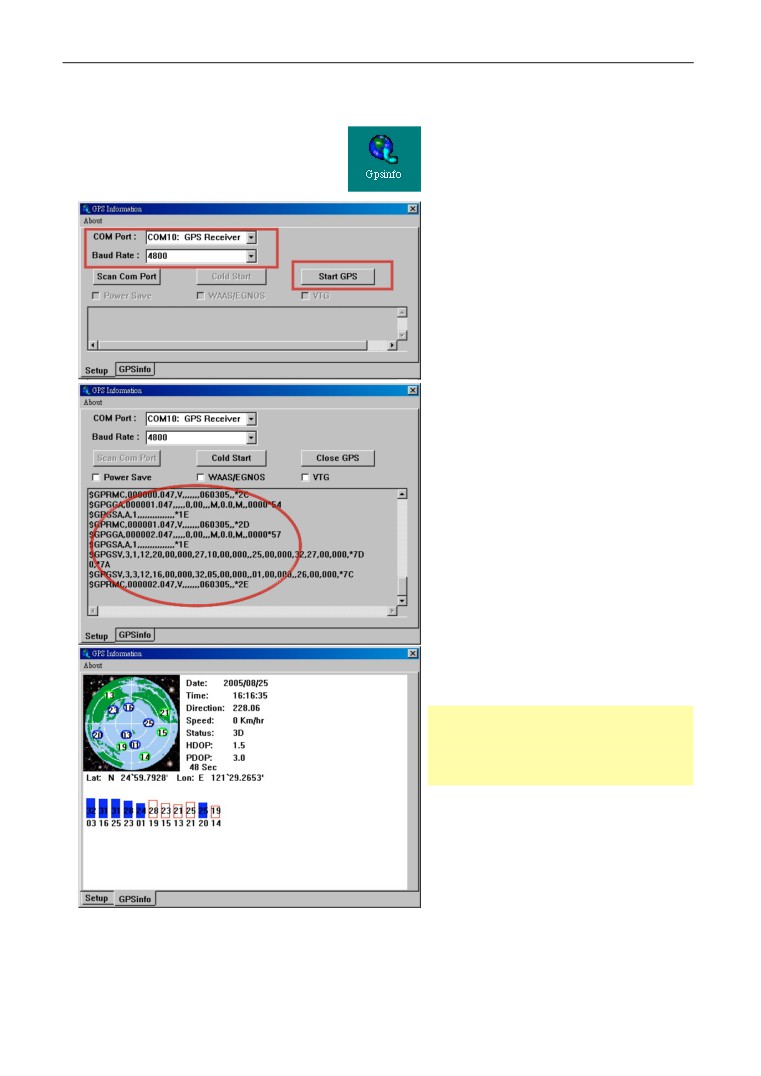
1. From desktop, double click the “Gpsinfo”
icon to start the GPS Information
program.
2. Select the correct COM Port and set the
Baud Rate to 4800.
3. Click “Start GPS” button to start receiving
the GPS data.
4. You will see the GPS data running in the
window.
5. Also you can switch to GPSinfo tab to see
the satellite information.
For more detail about this GPS Info testing
program, please refer to the GPS Information
User Manual, you can find it in the CD.
(“gpsinfo_menu_Eng_rev Ver 1.02.pdf”)
page 12 of 15
BC-337 User Manual
version 1.2
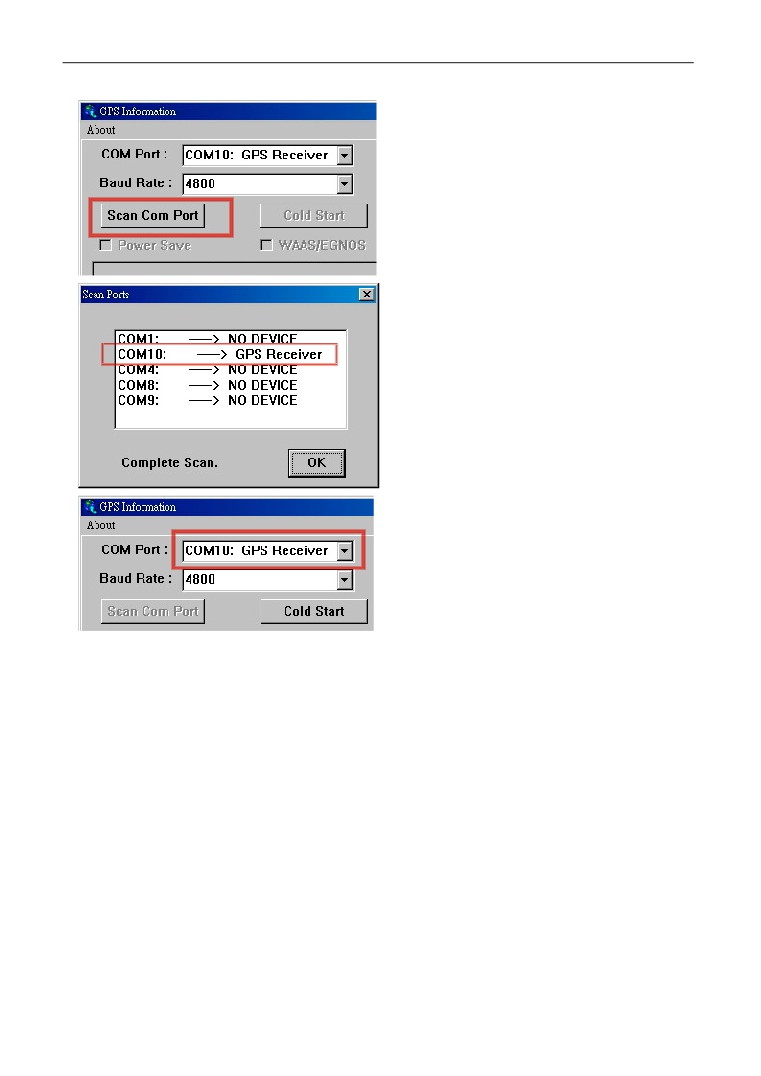
6. If BC-337 can not receive the GPS data,
please check if you select the correct COM
Port. You can click the “Scan Com Port”
button to let the program scan for you.
7. A “Scan Ports” dialog box will appear and the
program starts to scan and find the device.
When the scan is completed, click “OK” button.
(If the scan is failed, please repeat the step 6
and do it again.)
8. The program will automatically set the correct
COM port number which it found the GPS
Receiver.
page 13 of 15
BC-337 User Manual
version 1.2
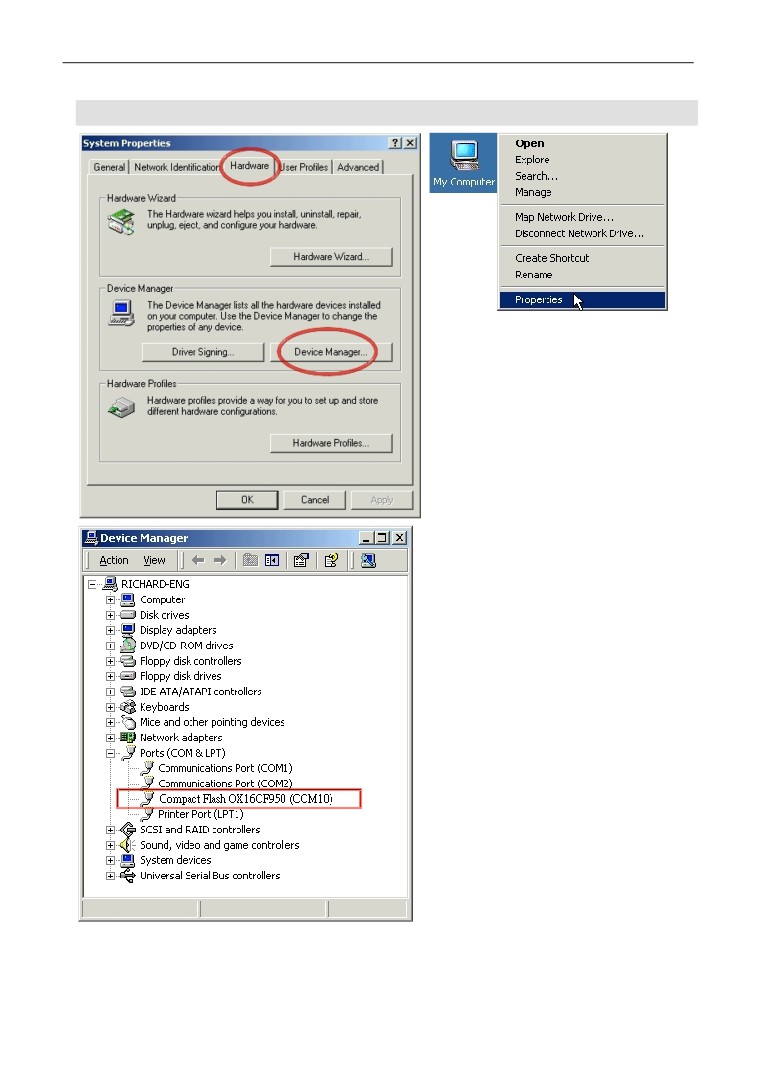
A tip to check the COM port of BC-337
1. From desktop, right click on “My
Computer” icon and click “Properties”.
2. In the “System Properties” dialog box,
click “Hardware” tab, and then click
“Device Manager” button.
3. In the “Device Manager” dialog box,
expand the “Ports” group and you can
find a Compact Flash device and its COM
port number.
page 14 of 15
BC-337 User Manual
version 1.2
FCC Notices
This device complies with part 15 of the FCC rules. Operation is subject to the following two conditions:
(1)This device may not cause harmful interference, and
(2)This device must accept any interference received, including interference that may
cause undesired operation .
FCC RF Exposure requirements:
This device and its antenna(s) must not be co-located or operation in conjunction with any other antenna or
transmitter.
NOTE: THE MANUFACTURER IS NOT RESPONSIBLE FOR ANY RADIO OR TV INTERFERENCE CAUSED
BY UNAUTHORIZED MODIFICATIONS TO THIS EQUIPMENT. SUCH MODIFICATIONS COULD VOID THE
USER'S AUTHORITY TO OPERATE THE EQUIPMENT.
page 15 of 15


